Upgrading Almalinux 9 Kernel
August 4th 2024
Greetings, Linux enthusiasts and tech-savvy readers! Today, we're diving into a crucial topic for any Linux user—upgrading your Linux kernel to the latest version. Whether you're a seasoned sysadmin or a curious newbie, understanding how to keep your kernel up to date is vital for ensuring your system's performance, security, and compatibility with the latest hardware and software.
Why Upgrade Your Linux Kernel?
The kernel is the core component of any operating system, acting as a bridge between your hardware and software. Here are a few compelling reasons to keep your Linux kernel updated:
- Security Enhancements: Newer kernels come with patches and updates that address vulnerabilities and security flaws, protecting your system from potential threats.
- Performance Improvements: Kernel upgrades often include optimizations that can enhance your system's speed and efficiency.
- Hardware Support: The latest kernels support newer hardware, ensuring compatibility with the latest devices and technologies.
- Bug Fixes: Regular updates fix bugs and issues that could be affecting your system's stability and reliability.
Preparing for the Upgrade
fore you begin the upgrade process, it's essential to take a few preparatory steps:
- Backup Your Data: Always have a recent backup of your important files and configurations. While kernel upgrades are generally safe, it's better to be prepared for any unexpected issues.
- Check Compatibility: Ensure that your system's hardware and software are compatible with the new kernel version. Some older hardware might not work well with the latest kernels.
- Review Documentation: Each distribution has its own tools and methods for upgrading the kernel. Familiarize yourself with the official documentation for your specific Linux distribution.
Step-by-Step Guide to Upgrading Your Almalinux 9 Kernel
Checking the current version of the almalinux kernel
To check the current version of the linux kernel you use, you can use this command
uname -msr
Example of the output
After that you can update the linux repository
sudo dnf update -y
Add ELRepo Repository on AlmaLinux 9
To update the kernel on AlmaLinux, you'll need to install the ElRepo repository, which provides the latest kernel version from kernel.org.
First, import the ElRepo GPG key with the following command
sudo rpm --import https://www.elrepo.org/RPM-GPG-KEY-elrepo.org
Then, run the command below to add and install the ElRepo on AlmaLinux 9
sudo dnf install https://www.elrepo.org/elrepo-release-9.el9.elrepo.noarch.rpm
List Available Kernels on AlmaLinux 9
To check the list of the linux kernel on your server, you can use this command
sudo dnf list available --disablerepo='*' --enablerepo=elrepo-kernel
The example of the output will be:
 From your output, observe the right-hand column, which displays a series of letters and numbers (e.g., '6.1.28-1.el9.elrepo'). This indicates the kernel version.
Use this information to choose the kernel version you want to install. The Linux 6 kernel is the latest mainline release, as shown.
Installing the latest kernel on Almalinux 9
To install the latest mainline kernel on AlmaLinux 9, run the command below
sudo dnf --enablerepo=elrepo-kernel install kernel-ml -y
Install the Latest Stable Kernel on AlmaLinux 9
To install the latest stable kernel, run the following command
sudo dnf --enablerepo=elrepo-kernel install kernel-lt -y
Reboot and then choose the kernel
At this step, you need to reboot the machine
sudo reboot
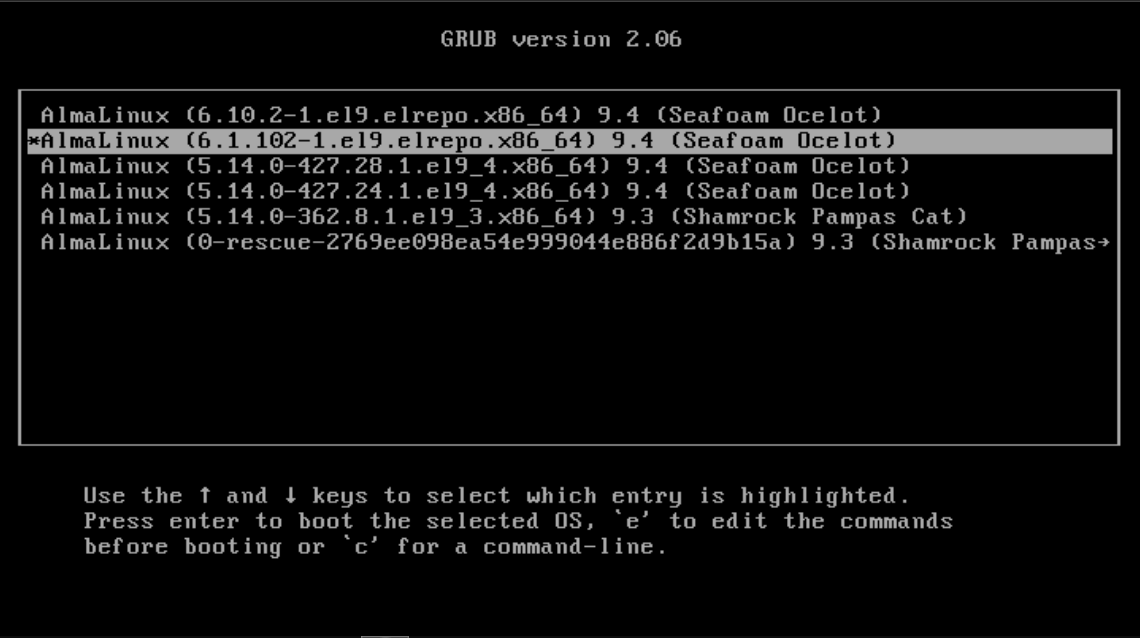
Then you will be presented with GRUB or Boot Menu
Use the arrow key to select the kernel you want to use
and then press Enter
 Verify the kernel used by using
uname -r
[root@localhost ~]# uname -r
6.1.102-1.el9.elrepo.x86_64
List the installed kernel on your machine
rpm -qa | grep kernel
Example output are
[root@localhost ~]# rpm -qa | grep kernel
kernel-modules-core-5.14.0-362.8.1.el9_3.x86_64
kernel-core-5.14.0-362.8.1.el9_3.x86_64
kernel-modules-5.14.0-362.8.1.el9_3.x86_64
kernel-5.14.0-362.8.1.el9_3.x86_64
kernel-modules-core-5.14.0-427.24.1.el9_4.x86_64
kernel-core-5.14.0-427.24.1.el9_4.x86_64
kernel-modules-5.14.0-427.24.1.el9_4.x86_64
kernel-5.14.0-427.24.1.el9_4.x86_64
kernel-modules-core-5.14.0-427.28.1.el9_4.x86_64
kernel-core-5.14.0-427.28.1.el9_4.x86_64
kernel-modules-5.14.0-427.28.1.el9_4.x86_64
kernel-5.14.0-427.28.1.el9_4.x86_64
kernel-tools-libs-5.14.0-427.28.1.el9_4.x86_64
kernel-tools-5.14.0-427.28.1.el9_4.x86_64
kernel-ml-core-6.10.2-1.el9.elrepo.x86_64
kernel-ml-modules-6.10.2-1.el9.elrepo.x86_64
kernel-ml-6.10.2-1.el9.elrepo.x86_64
kernel-lt-core-6.1.102-1.el9.elrepo.x86_64
kernel-lt-modules-6.1.102-1.el9.elrepo.x86_64
kernel-lt-6.1.102-1.el9.elrepo.x86_64
Set the Default Kernel Version on AlmaLinux 9
After you installed the new kernel and confirm that new kernel are working properly on your machine, you can make it as default kernel when booting up, you can do it by editing the GRUB, edit the file in /etc/default/grub
sudo nano /etc/default/grub
or using any text editor you want like vim
sudo vi /etc/default/grub
Once the file opens, locate the line that says GRUB_DEFAULT=X and change it to GRUB_DEFAULT=0. This modification will instruct the boot loader to default to the first kernel on the list, which is the latest one.
Save the file, and then type the following command in the terminal to recreate the kernel configuration
sudo grub2-mkconfig -o /boot/grub2/grub.cfg
Reboot the machine
sudo reboot
Then verify the kernel
uname -r
Done
Thank you for reading my blog! I hope this guide has helped you understand how to upgrade and manage your Linux kernel. Happy computing!
< options for installing php |
